Setup & Activate
Activating Consent Mode in the AdOpt panel will add the phrase "Share analytics, advertising data, user data, and ad personalization data with Google" to your Cookie Banner.Info
First, it is necessary to activate GCM v2 in the AdOpt dashboard, following
this tutorial.
Or follow these steps:
-
Log in to your AdOpt account.
-
Access your (1) Organization.
-
Make sure to select the (2) Disclaimer in which you want to enable this feature.
-
Go to the (3) Settings stage of your Disclaimer.
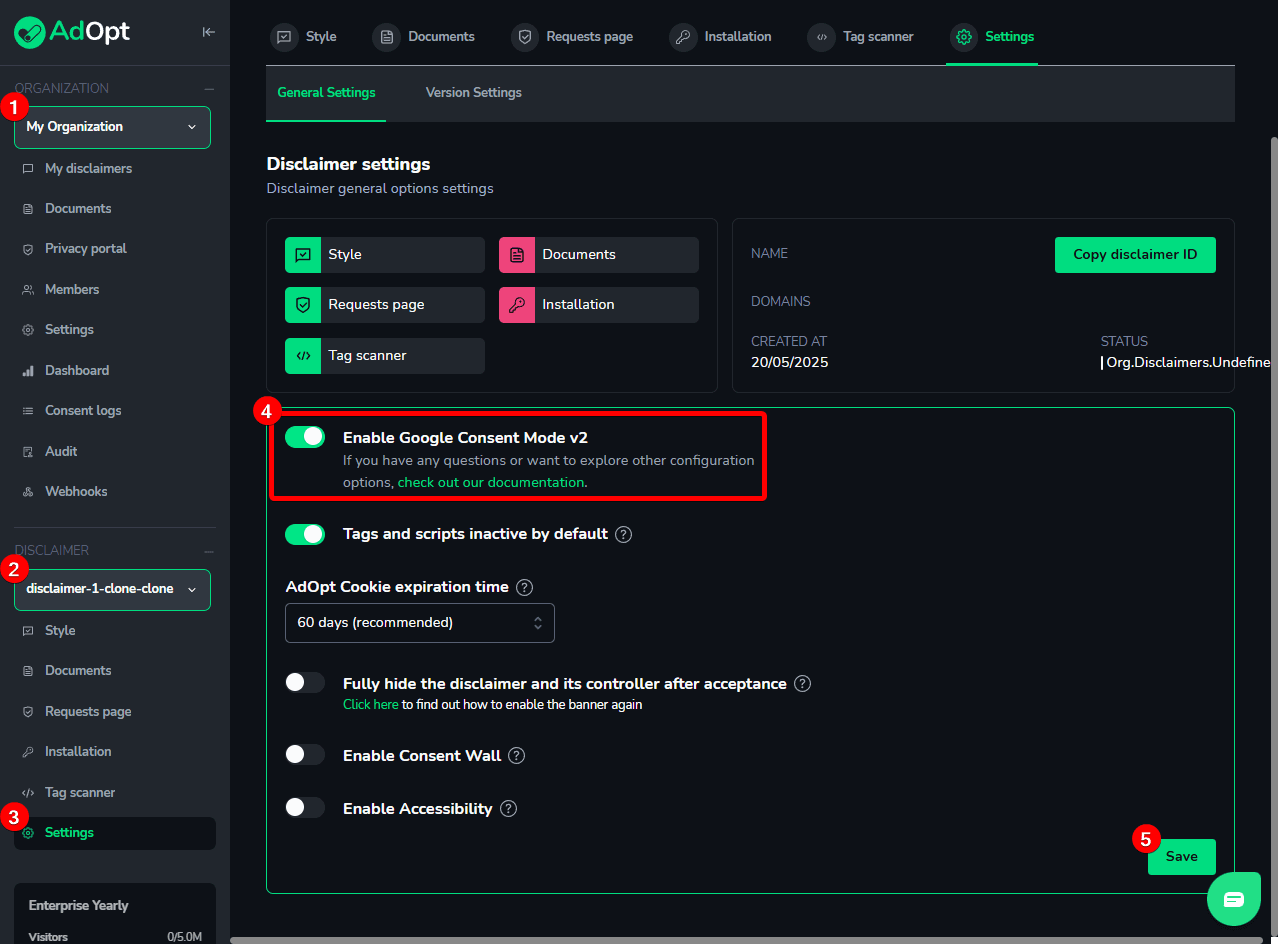
5. Toggle the (4) Enable Google Consent Mode v2 button.
6. Click (5) Save to save the new configuration.
7. Done! AdOpt will manage Google cookies' consent automatically.
You can also configure GCM default states directly on your site before the AdOpt script executes, using the following snippet:
<script>
  window.adoptConsentModeSettings = [
    {
      region: 'BR',
      ad_storage: 'granted',
      ad_user_data: 'denied',
      ad_personalization: 'denied',
      analytics_storage: 'granted',
      functionality_storage: 'denied',
      personalization_storage: 'denied',
      security_storage: 'granted'
    }
  ]
</script>
This configuration will be used as default until the user interacts with the Disclaimer.
Another convenient way to install the disclaimer is using the AdOpt template in GTM.
- Access your Google Tag Manager account.
- Go to the "Template Gallery" and search for AdOpt.
- Add the template to your account.
- Enter the disclaimer code provided in the AdOpt dashboard.
- Configure the default Google Consent Mode settings directly in the template.
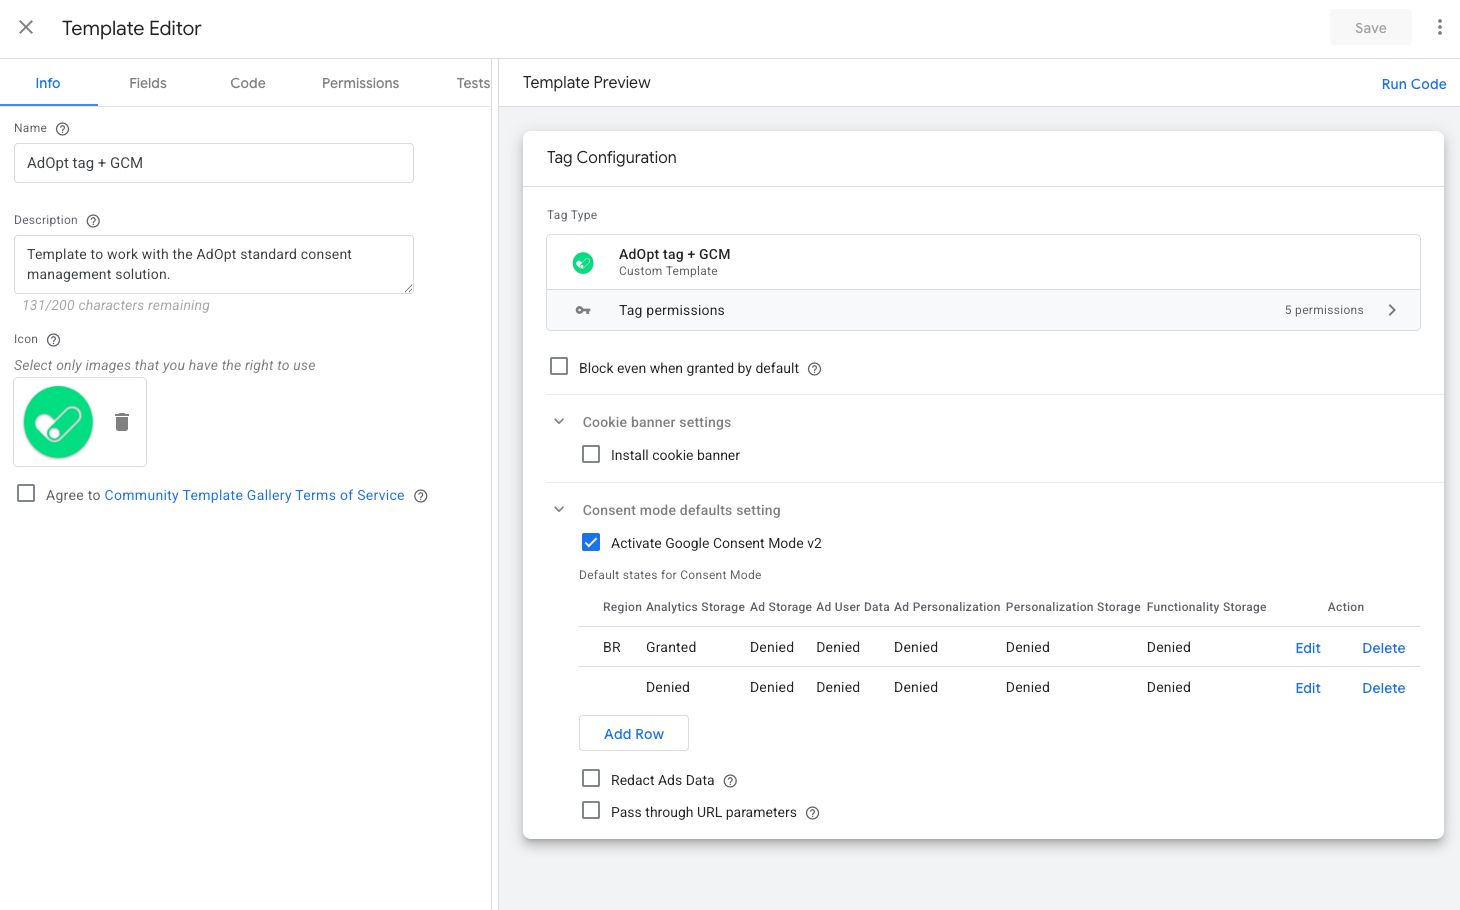
Publish the container.
The template already includes GCM support and allows you to define initial consent states (e.g., analytics_storage: 'denied').Important
Google defines two operating modes for Consent Mode: basic mode and advanced mode. Your choice directly impacts when (and how) Google services are loaded on your website.
In basic mode, Google services (Analytics, Ads, etc.) are only loaded after the visitor gives consent.
This means that no Google script runs until the user accepts cookies.
This mode prioritizes user privacy and is aligned with regulations like LGPD and GDPR.
How to configure:
- In Google Tag Manager, set your triggers to fire only after consent is received via AdOpt. Check the tutorial
- For code integrations, insert Google scripts only after consent confirmation by AdOpt.Check the tutorial
Advantages:
- No Google data is loaded before consent.
- Maximum privacy for the user.
Limitations:
- Data from users who do not consent will not be collected, which can reduce the amount of data in your Analytics and Ads reports.
In advanced mode, Google services are loaded as soon as the user accesses the site, regardless of consent.
Consent Mode then adjusts the behavior of these scripts according to user consent:
- If the user accepts, everything works as usual.
- If the user refuses, Google collects only anonymous data, with no tracking or personalization.
How to configure:
- With Consent Mode activated via AdOpt, configure your Google scripts to load on all pages, without conditioning them on prior consent.
- Consent Mode will inform Google about each visitor’s consent status.
Advantages:
- Anonymous data is collected even from those who refuse cookies, allowing Google to model metrics and provide more complete reports.
- Less impact on the accuracy of Analytics and Ads metrics.
Limitations:
- There are still tracking limitations for users who refuse cookies, but the impact is less than with basic mode.
- Prefer basic mode if your top priority is maximum user privacy.
- Consider advanced mode if you want more complete reports, even if some data is modeled from anonymous information.
- Basic Mode: The Google Analytics script is only loaded after the user accepts cookies in the AdOpt banner.
- Advanced Mode: The Google Analytics script is loaded on every visit, but only uses tracking cookies if consent is given.
To enable debug mode, run the following command in your browser’s developer console. AdOpt logs will appear directly in the console.
If you want to track the page load process from the beginning, we recommend refreshing the page after enabling debug.
sendAdoptCommand('debug')
🔎 For more information about consentMode, check the official Google guide. And remember, if you detect issues related to the absence of Consent Mode or TCF signals on Google tags, please contact AdOpt first.
AdOpt
Resources
Legal Terms
© GO ADOPT, LLC since 2020 • Made by people who love
🍪